Design of the Month
-
"Ganesha Goes Glassing"
Having decided that the design would be a circular illustration of six stages of making a stained glass panel, I started by taking six digital photos of my right hand holding various tools: computer mouse, pistol glasscutter, grozers, lead knife, soldering iron and stopping knife. I carefully posed my hand so that there would be no uncuttable shapes, then imported the JPEG images into Glass Eye 2000 as the backgrounds of six separate designs. I selected a distinct custom drawing colour to make my lines easily visible,
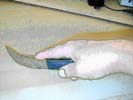 then hand-traced each image. In some cases the hand holds the tool a bit unnaturally to make the tool recognizable,
and some lines (as in the folds on digits/thumbs) are to be done as foil or lead overlays on a large single glass piece. Opening a new design,
I copy-and-pasted each traced hand into a new "composite page" of the six designs to be manipulated as six separate groupings.
I verified that all pieces would be cuttable, and resized the hands to a consistent 17″ width.
then hand-traced each image. In some cases the hand holds the tool a bit unnaturally to make the tool recognizable,
and some lines (as in the folds on digits/thumbs) are to be done as foil or lead overlays on a large single glass piece. Opening a new design,
I copy-and-pasted each traced hand into a new "composite page" of the six designs to be manipulated as six separate groupings.
I verified that all pieces would be cuttable, and resized the hands to a consistent 17″ width.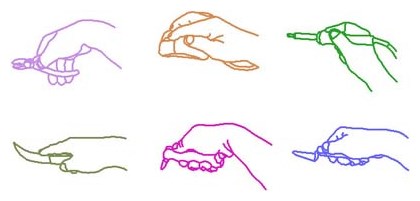
I opened another new design and created a working template to lay the hands onto. I used the Draw Circle command to draw a 17″ radius maroon circle, then I subdivided the circle to give me enough reference knots to divide the circle into six pie shapes.
I used Copy and Paste to copy each of the hands from my composite page onto the pie template. With each copied hand selected, and with the Sticky option turned off to avoid attaching the hand to the pie, I used dragging and the Rotate command to place each hand at the desired location.

Finally I highlighted the whole hands-and-template design and pasted a copy into a new design. I could then delete all the redundant pie template, leaving just the joined-up hands.

After moving aside my copied hands-circle, I Googled a standard colour wheel image of continuous colour-drift, imported it as a background, and drew a second template: two concentric inner and outer circles, which I highlighted and subdivided into twelve sections.
With Sticky still off, I dragged my hands-circle over the clock-face template. Now with Sticky on, I anchored it to the template and added knots wherever the hands-design crossed the clock face. I subdivided six radial lines in half to give me a reference knot at the middle of each line. I now added six upright ellipses centered at those knots, giving me cuttable and pleasing background shapes. Negative background space is as important in a stained glass design as foreground details!
After adding knots wherever the ellipses crossed the hand outlines, I deleted any ellipse or hour-hand lines that sat inside a hand, thus making the background recede visually.
Although I'd previously done a tentative experimental colouring of the tools, I was now able to choose the final colours, basing them on those lying opposite on the colour-wheel background. This is where I found the eyedropper feature invaluable. After entering Color mode, I hovered my cursor over a typical background colour on my colour wheel background. I held down the Shift key, and the paint bucket cursor turned into an eyedropper, enabling me to select that colour and then place it onto an unused color button. I could then use the palette to colour individual pieces of the tools in my design. Colouring each background piece was even easier. I simply used the eyedropper to select a colour off the colour wheel, then immediately placed that colour onto a piece. This gave me solid colours for later matching with chosen glass. I then removed the colour wheel image and my design was complete.
~ Tony Banfield
About the artistAfter ten years as a designer of theater graphics, Tony taught himself stained glass in 1976. Several commissions later, he started and ran a successful company of twelve artisans, designing his own copper foil lamps and exporting them to Germany. Since selling the company in 1982, Tony has run his own one-man studio working on commissions. Tony lives and works in England, where they spell "color" differently! He can be reached by email.
This pattern may be used to make one or more artworks for sale or personal enjoyment. This pattern may be printed for personal use only and may not be sold or given away in printed or electronic form.
Each month we feature a project designed using Glass Eye 2000. Do you have a project to share with the world? Contact Dragonfly Software and your creation might be our next Design of the Month.