|
"Brooklyn"
 Ten
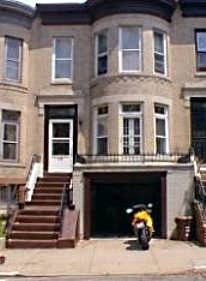
years ago, I said goodbye to my downtown loft and moved into an
old row house. Almost every house on the street, except
this one, was well maintained. I liked the style of the
house and intended to return it to some of its former glory. Ten
years ago, I said goodbye to my downtown loft and moved into an
old row house. Almost every house on the street, except
this one, was well maintained. I liked the style of the
house and intended to return it to some of its former glory.
In this renovation project, I ended up with a redundant
doorway after merging two bedrooms into a master bedroom. I
decided to replace the doorway with a knee wall topped with a
pair of stained glass panels installed into frames. These would
bring natural light in from the south-facing bedroom windows.
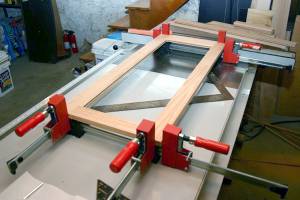
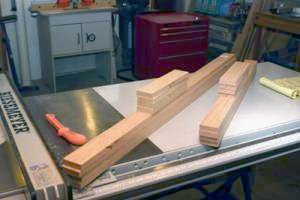 With the measurements done, the first thing I needed to do was
construct empty frames out of red oak. The boards were run
through a surface planer to make sure they were of identical
thickness. This is an important step for rail and stile
construction. After the blanks were cut, it was on to the
router table. The trick with rail and stile sets is making
sure that they cut
a
deep enough recess for the panel and they are aligned to each
other. What I do is rip several pieces of scrap plywood
and use them to set the router depth. With the measurements done, the first thing I needed to do was
construct empty frames out of red oak. The boards were run
through a surface planer to make sure they were of identical
thickness. This is an important step for rail and stile
construction. After the blanks were cut, it was on to the
router table. The trick with rail and stile sets is making
sure that they cut
a
deep enough recess for the panel and they are aligned to each
other. What I do is rip several pieces of scrap plywood
and use them to set the router depth.
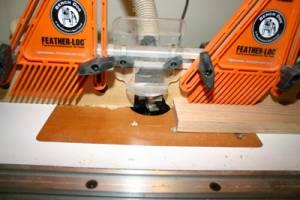 While experience and
eyeballing will get you in the ballpark, it's still pretty much
of a trial and error process. Needless to say, when you've
got the router adjusted for a bit you should make all of your
cuts that use that bit. I like to use
Bessey K-Clamps for things like this because adjusting tension
on the clamps helps bring the fabrication into square. While I
can visualize things pretty well, I have found that you need to
have a completed design for stained glass construction. My
stained glass work to date has been pretty simple and angular. While experience and
eyeballing will get you in the ballpark, it's still pretty much
of a trial and error process. Needless to say, when you've
got the router adjusted for a bit you should make all of your
cuts that use that bit. I like to use
Bessey K-Clamps for things like this because adjusting tension
on the clamps helps bring the fabrication into square. While I
can visualize things pretty well, I have found that you need to
have a completed design for stained glass construction. My
stained glass work to date has been pretty simple and angular.
 I began my hunt for stained glass software because I wanted
something a bit more artistic. I chose Glass Eye 2000 from
Dragonfly Software because it is high quality and the best
design software I could find. I began my hunt for stained glass software because I wanted
something a bit more artistic. I chose Glass Eye 2000 from
Dragonfly Software because it is high quality and the best
design software I could find.
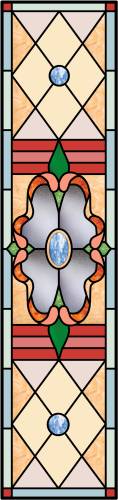
For my master bedroom stained glass design, I took the
center medallion from the stock patterns that come with Glass
Eye 2000. It was originally part of a transom window
design and looked quite a bit different. I extracted,
rotated and resized it then removed a couple of elements, added
another and inserted it into a vertical frame. Then I
filled in the frame with the crosshatch pieces, border, etc.
The entire design took me about three hours to design.
 There
are several ways to begin a design in Glass Eye 2000. The
easiest is to Browse Designs which will allow you to use as-is
or modify to suit over four hundred completed designs and
bevels. A very powerful feature in Glass Eye 2000 is AutoTrace.
This works pretty well with simple graphics, like a basic pencil
sketch. Dragonfly Software also offers packages of optional
patterns ranging from Edwardian designs to cute little animals. There
are several ways to begin a design in Glass Eye 2000. The
easiest is to Browse Designs which will allow you to use as-is
or modify to suit over four hundred completed designs and
bevels. A very powerful feature in Glass Eye 2000 is AutoTrace.
This works pretty well with simple graphics, like a basic pencil
sketch. Dragonfly Software also offers packages of optional
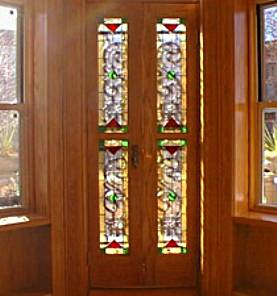
patterns ranging from Edwardian designs to cute little animals. 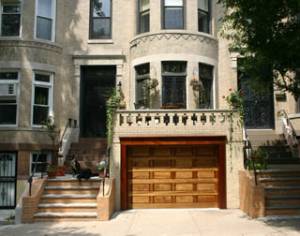 Another sample of the stained glass work I have done using
Glass
Eye 2000 are the red oak French doors above that I built myself. I have several stained glass projects to do: the media
cabinet in the living room, the skylight over the stairs, the
bathroom skylight and more windows. Glass Eye 2000 does
everything but cut the glass for you! Another sample of the stained glass work I have done using
Glass
Eye 2000 are the red oak French doors above that I built myself. I have several stained glass projects to do: the media
cabinet in the living room, the skylight over the stairs, the
bathroom skylight and more windows. Glass Eye 2000 does
everything but cut the glass for you!
~ Steve Manes
About the artist
Steve Manes is president of Brooklyn Technical Services LLC,
which designs and builds enterprise web sites for large
companies and organizations. He is a former professional
musician, experienced woodworker and home renovation fanatic. You
are invited to read his home
improvement blog.
Download "Brooklyn"
in Glass Eye 2000 format |
|
This pattern
may be used to make one or more artworks for sale or personal
enjoyment. This pattern may be printed for personal use
only and may not be sold or given away in printed or electronic
form. |
Each month we feature a project designed using Glass Eye 2000.
Do you have a project to share with the world?
Contact Dragonfly Software and your creation
might be our next Design of the Month.
see
last month's
design
|
