Even after working through all the previous lessons you might still be wondering how to use Glass Eye 2000 to construct a complete stained glass window design. In this lesson we will make a design from start to finish, illustrating many of the tools. This example should help to make clear what sort of process to go through to create a design.
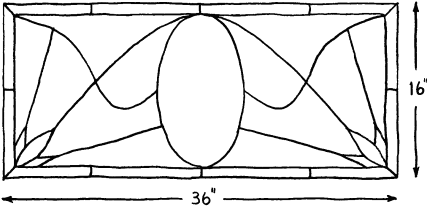
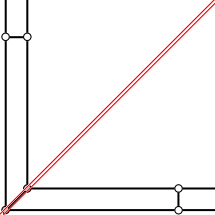
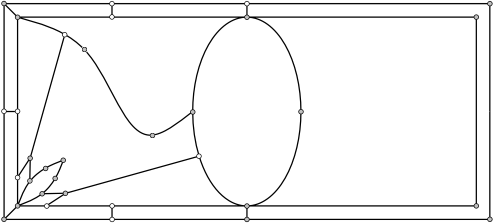
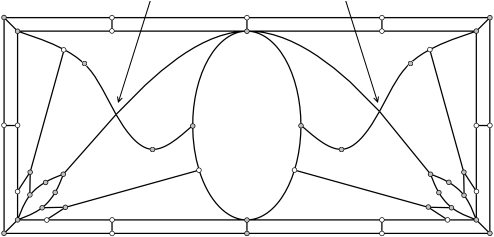
Suppose you made a sketch like the one you see to the right.
Now you want to make a Glass Eye design from this sketch, but you don't have a scanner. Here is one way you might proceed. Follow along, and by the end of this lesson you will have drawn the entire pattern.
Start a new design, and be sure that the Sticky and Show Knots properties are enabled. Choose "Units and Precision" from the View menu and choose design measurement units in inches, with a display format in fractions and a precision of 1/8".
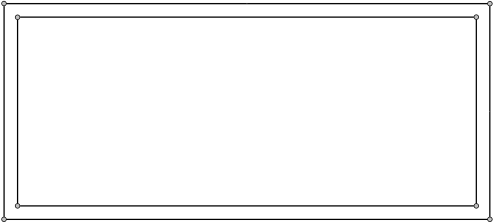
Choose "Rectangle" from the Draw menu, then choose "Corner, Dimensions" from the shortcut menu as the drawing method. Now draw a rectangle in the view, approximately the shape of the outer edge of our sketch. We know we want the design to measure 36" x 16", so let's dimension the rectangle right away. Choose "Resize All" from the shortcut menu and resize the rectangle to a width of 36" and a height of 16".
Once this is done, the rectangle is now probably much larger than before; in fact, it has probably grown outside the area currently visible in your view. Do a Zoom All (the Enter key) to show the whole rectangle once again.
![]() Now is a good time to enable Show Hairlines (if it was not already). Hairlines are drawn faster and are sometimes easier to see than thick lines.
Now is a good time to enable Show Hairlines (if it was not already). Hairlines are drawn faster and are sometimes easier to see than thick lines.
Looking at our sketch again, we need about a 1" border inside the outer edge of the design. We will use the grid to help make this precise.
![]() Turn on Auto Grid Snap. (Don't just show the grid; be sure the Auto Grid Snap
button is pressed in.) Now use View Properties (on the View menu) to make sure we have horizontal and vertical spacing each set to 1". Click OK when
ready. We now need the grid to line up exactly with the rectangle we have just drawn, so choose "Set Ruler Origin" from the View menu and click on the
knot at the bottom left corner. There is always a grid point at the ruler origin, and since grid lines are spaced at even 1" intervals our rectangle
and the grid line up exactly.
Turn on Auto Grid Snap. (Don't just show the grid; be sure the Auto Grid Snap
button is pressed in.) Now use View Properties (on the View menu) to make sure we have horizontal and vertical spacing each set to 1". Click OK when
ready. We now need the grid to line up exactly with the rectangle we have just drawn, so choose "Set Ruler Origin" from the View menu and click on the
knot at the bottom left corner. There is always a grid point at the ruler origin, and since grid lines are spaced at even 1" intervals our rectangle
and the grid line up exactly.
Turn rulers on by clicking the Show Rulers toolbar button. The rulers will show you that your design is indeed 36" x 16".
![]() You can turn the rulers off and on as you like during this lesson. Having them off for now is probably the best choice as it leaves the view less
cluttered.
You can turn the rulers off and on as you like during this lesson. Having them off for now is probably the best choice as it leaves the view less
cluttered.
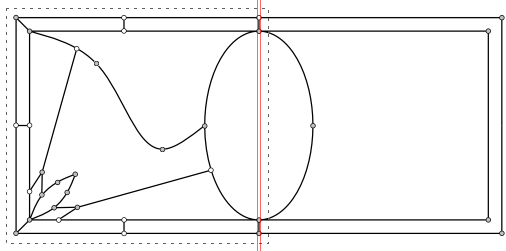
Now draw the inner rectangle. Use the grid to make a second rectangle exactly 1" inside the first. Automatic grid snapping makes it easy to be precise. After drawing, return to Pick mode. Your design should now look like what is shown below.
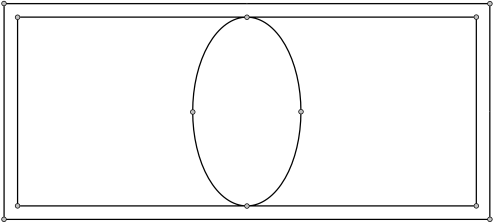
We now want to place the ellipse in the center, and the grid will help with this too. Having a mark to indicate the halfway point between the left and right ends of the design will be helpful, so let's use the Subdivide command for this.
Select the topmost horizontal line of the inner rectangle and then choose "Subdivide" from the shortcut menu. For the number of subdivisions, enter 2 and then click OK. The new knot is now exactly halfway across the design.
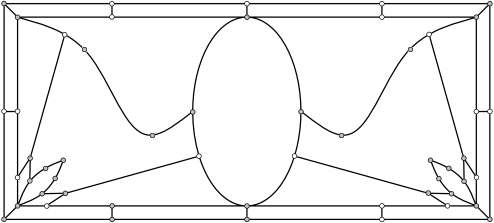
Now choose "Ellipse" from the Draw menu. Bring up the shortcut menu and choose "Center, Dimensions" as your drawing method. Using the knot you just added as a guide, click on the grid point at the very center of your design. (You can probably judge the vertical halfway point using the grid marks alone. Another way to locate the center is to find the point 18", 8" by reading the fields at the right end of the status bar.) Next, make an ellipse like the one below by clicking with the mouse about four inches to the right of the knot you just added with the Subdivide command; this would be at location 22", 15". If the ellipse does not look like what you see below, click Undo and try again.
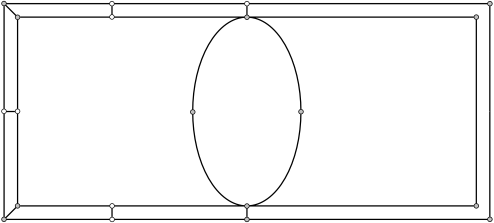
We can take advantage of the horizontal symmetry in this design. For most of our remaining work, we will add to only the left side and later reflect that work onto the right.
![]() Now add the short lines that lie between the two rectangles. We need only add to the ones on the left and down the center:
Now add the short lines that lie between the two rectangles. We need only add to the ones on the left and down the center:
We'll now work on the three-pointed pattern in the lower left corner of the window.
![]() Turn off the grid and zoom in on that corner — the best way is to enter Zoom mode and then drag a zoom box around the area of interest.
There is a diagonal line of symmetry in that pattern, so let's design half of it and then reflect to get the other half.
Turn off the grid and zoom in on that corner — the best way is to enter Zoom mode and then drag a zoom box around the area of interest.
There is a diagonal line of symmetry in that pattern, so let's design half of it and then reflect to get the other half.
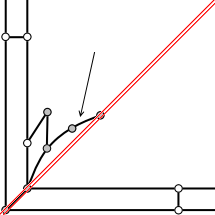
![]() Turn on the diagonal crosshairs. Enter Pick mode and position one of the crosshairs over one of the corner knots as shown.
Be sure you release the mouse button when the pointer is directly over one of the corner knots or the crosshair may not be positioned perfectly.
Turn on the diagonal crosshairs. Enter Pick mode and position one of the crosshairs over one of the corner knots as shown.
Be sure you release the mouse button when the pointer is directly over one of the corner knots or the crosshair may not be positioned perfectly.
Now draw three curves to create one half of the corner pattern. Don't worry about making your pattern look exactly like the one pictured.
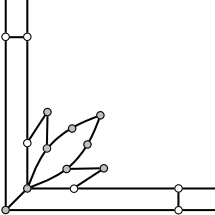
Select the three curves you have just drawn, choose "Reflect" from the shortcut menu, and choose "Across /" as the reflection method. After
you have done this, unselect the lines (just click in the view where no lines are nearby) and then turn off crosshairs.
Do a Zoom All by pressing the Enter key.
![]() Now is a good time to save the work you have done so far. Click the Save button, type a name of your choice for this design, then click "Save."
Now is a good time to save the work you have done so far. Click the Save button, type a name of your choice for this design, then click "Save."
Now add the following curve:
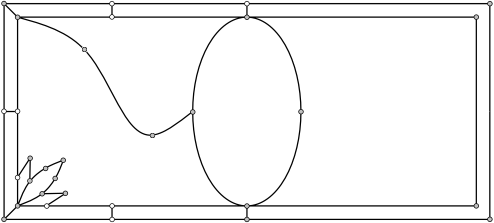
Next add two straight lines. Remember to draw straight lines using the Curve command!
Again, it doesn't matter if your lines look somewhat different from the ones shown here.
![]() Now you can reflect your work on the left half of the design over to the right. Turn on horizontal/vertical crosshairs, enter Pick mode, and drag the
vertical crosshair to the knot at the top of the ellipse. (If you don't see the vertical crosshair, use the Set Crosshairs Origin command on the View
menu.) Then drag out a select box as follows:
Now you can reflect your work on the left half of the design over to the right. Turn on horizontal/vertical crosshairs, enter Pick mode, and drag the
vertical crosshair to the knot at the top of the ellipse. (If you don't see the vertical crosshair, use the Set Crosshairs Origin command on the View
menu.) Then drag out a select box as follows:
Choose "Reflect" from the shortcut menu, and choose "Across |" as the reflection method. After you have done this, unselect lines and turn off the crosshairs. You now have the following design:
Only one more line to go! Draw the final curve now. You can draw this the usual way — no need to bother with reflecting. Don't add any knots but just use the existing ones!
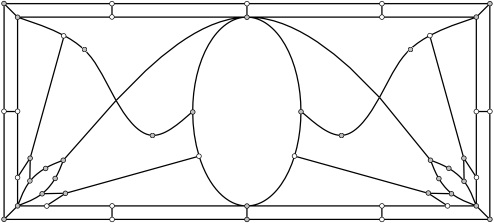
To be able to color you will have to add knots at the points where this new curve crosses two other curves. Use the Add Knot command to add those knots now:
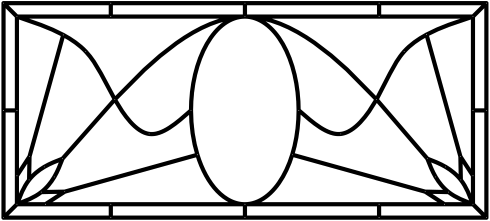
Now turn off hairlines and turn off knots. Select all lines in the design (pressing Ctrl+A is one way to do it) and choose "Line Properties" from the shortcut menu. Choose a lead width of ¼". Your pattern should now look like this:
You can experiment with other lead widths if you like.
Now let's color the design. Click on a color you like for the border pieces (if you don't see one you like on the color palette, double-click one of the buttons and choose a color using the Color Selector dialog box), and then drag a color box around the entire design. This colors the pieces in the border, but then it colors every piece in the window! You can now assign different colors to the non-border pieces. Choose glass or textured color as you wish.
You should be able to color all pieces in this window. If you cannot color a piece, use the Suggest command on the Help menu to determine what the problem is. If you get a suggestion about a missing knot at the top of the ellipse, you can probably ignore it: the lines might cross a little as they approach the knot, but the program should be able to sort that out.
Choose "Page Setup" from the File menu, and in the Page Setup dialog box choose a Format of "All on one page" and an orientation of "Landscape." Click OK. Now click on the Print Preview toolbar button to see how the design will look when printed. If you are satisfied with its appearance, click the Print button to print the page.
Close this design and save your changes. Your design is saved using the name you gave it earlier.
Congratulations! You've have completed all twenty lessons. By now you should be quite proficient in using Glass Eye 2000. Now go forward and create beautiful designs of your own.