In this lesson you'll learn how to edit with multiple designs and multiple views. This lesson is not essential and can be skipped if you wish to jump ahead to the last lesson.
You can edit more than one design at a time, and you can even edit using more than one view of a single design. Let's see how this works.
Before we get started, close any open design by choosing "Close" from the File menu. Continue closing designs until "Close" no longer appears on the File menu. After this your main window should show no design at all.
Open the "Flag" file again. Now without closing that file, open the "Mushroom" file. The flag disappears, and you see the mushroom. But what happened to the flag?
 What has happened is that both designs are loaded but you are currently seeing only one of them. Click on "Window" in the menu bar and you'll see the menu
shown here. At the bottom of the menu we see the two file names: Flag and Mushroom. The check mark next to "Mushroom" tells you that you are currently
viewing the design of that name. Now click on "Flag" and the view of the flag appears. Bring up the Window menu again and click on "Mushroom" and the
view of the mushroom returns. When editing multiple designs you can edit in either view, switching back and forth as you please.
What has happened is that both designs are loaded but you are currently seeing only one of them. Click on "Window" in the menu bar and you'll see the menu
shown here. At the bottom of the menu we see the two file names: Flag and Mushroom. The check mark next to "Mushroom" tells you that you are currently
viewing the design of that name. Now click on "Flag" and the view of the flag appears. Bring up the Window menu again and click on "Mushroom" and the
view of the mushroom returns. When editing multiple designs you can edit in either view, switching back and forth as you please.
You can even see multiple designs simultaneously, which can be useful for comparing designs or for cutting and pasting between designs. Choose "Cascade" from the Window menu. The designs now appear in small windows within the main window, one hiding behind the other. Try dragging the title bar (the top of the window where the design name appears) to move a window, or try resizing a window. Whichever view you click on becomes the active view, and is available for editing. If views overlap, the active view is always on top. Watch how the color palette changes as you click in the windows: the palette always shows the colors for the active view.
Now choose "Tile" from the Window menu. The two views are shown side by side. Try zooming and panning each view, remembering first to click in the view you want to be active.
 There is no menu command to return to single-view editing because you can do it with a single click. Look at the triplet of buttons at the
top right corner of each view. Clicking the middle button "maximizes" that view to full size. Try this now by clicking the maximize button of
either view. You are now back to single-view editing for that design.
There is no menu command to return to single-view editing because you can do it with a single click. Look at the triplet of buttons at the
top right corner of each view. Clicking the middle button "maximizes" that view to full size. Try this now by clicking the maximize button of
either view. You are now back to single-view editing for that design.
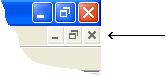
The triplet of buttons for that view now appears in the top right corner of the application, as shown here. Don't confuse that triplet with the resize/close buttons for the main window that appears right above it!
The middle button now serves to "restore" the window to its smaller shape. Try clicking the restore button now.
In addition to editing multiple designs simultaneously, you can also edit with multiple views of the same design. We will do this now.
Close the mushroom design. You can do this by making it the active view and then choosing "Close" from the File menu. You can also do this by clicking the "X" button at the top right of its view.
You are now left with the flag design. Choose "New View" from the Window menu. You now have another view of the flag. It is important to understand that you have two views on the same design — think of it as like having two photographs of the same person from (potentially) two different angles.
Choose "Tile" from the Window menu to place these windows side by side. Do a Zoom All in each view. (Remember that the Enter key performs a Zoom All.)
By this time, you might be wondering what is useful about having two views of the same design. In truth this is a rarely-used feature, but let's see one potential application. In the left-hand view, make sure that color is showing and that hairlines and knots are not shown. In the right-hand view, make sure that color is not shown and that hairlines and knots are showing. Now zoom the right-hand view so that the star fills the view.
You now have two very different views. The view on the left shows you a realistic rendering of the flag: you see the whole flag, with color, with thick lines, and without knots. The view on the right shows you a view more suitable to pattern editing: no color, with hairlines and knots showing. In the right-hand view, drag one of the knots. You will see the change reflected in both views as you drag. Experiment with different changes in the right view, or even switch and make changes in the left view.
The purpose of this is that you might find it easier to edit a design when the view properties are set as they are in the right-hand view, but you might prefer to see the design as it appears on the left. With multiple-view editing, you can have both.
Close the flag design without saving any changes.
Next Lesson: Putting it All Together