In this lesson you will learn the tools for adding color to your designs. By "color" we mean both ordinary solid colors as well as images of glass. You'll learn how to search for colors, how to apply textures to colors, how to color a piece, and how to change the color of several pieces at once. You'll also learn about various options for displaying color in designs.
 Open the "Flag" file in the Tutorial folder. This is a design composed of eight pieces in three colors. In Lesson 4 we
discussed how to use the color palette to make a color the "working color" and how to change the color of a piece. Let's look at the basic coloring commands in more detail.
Open the "Flag" file in the Tutorial folder. This is a design composed of eight pieces in three colors. In Lesson 4 we
discussed how to use the color palette to make a color the "working color" and how to change the color of a piece. Let's look at the basic coloring commands in more detail.
![]() Clicking on a color button puts you in Color mode. You can also use the Color toolbar button, shown at the left, to enter Color mode. In color mode you can click
on pieces to give them the working color.
Clicking on a color button puts you in Color mode. You can also use the Color toolbar button, shown at the left, to enter Color mode. In color mode you can click
on pieces to give them the working color.
At the top of the color palette is a blank button you can use to remove color. Click that button now to select "color removal" as the working color. Now click within the star and watch its color vanish.
You know how to change the color of one piece, but let's say you want to change all the red pieces in the flag to blue. After making blue the working color you could click on each of the four red pieces, but a faster way is simply to click on one red piece with the right mouse button. Using the right mouse button means "change the color of this piece, and any other piece of the same color, to the working color." Try this by clicking the blue color button and then clicking with the right mouse button on any red piece. All red pieces will change to blue.
After a color change can be a good time to use the Undo and Redo operations. By going back and forth between two alternative colorings using Undo and Redo you can judge which coloring you like best. Click Undo a few times until the flag is restored to its original colors.
Another way to change the color of several pieces is to drag a color box around the pieces you want to color. Try this now. Click on one of the color buttons, then drag a box around the entire flag. Watch all pieces change to the working color. Click Undo to restore the original colors.
The colors now on the color palette are only a few of the millions of available colors. You select new colors by double-clicking one of the color buttons, or you can use a right button click if you prefer. This tells the computer that you want to change the color on that button.
Try this now by double-clicking the color button that currently looks blue. When you do so, the Color Selector dialog box appears. The easiest way to pick a color using this dialog box is to click in the spectrum control (the large, rainbow-hued square) and then to click in the luminance bar (the thin rectangle to the right of the spectrum control) to adjust brightness. Clicking higher in the luminance bar makes the color brighter; clicking lower makes it darker. Your color appears in the box in the bottom-left corner.
Use the dialog box to choose a deep shade of purple. Also try dragging (instead of clicking) the mouse pointer in the color controls. After you make your spectrum control and luminance bar choices your dialog box might look like this:
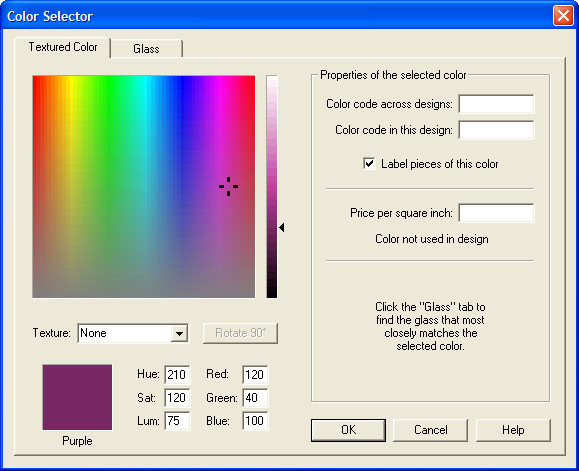
Notice that the name of the color appears under the color box. When you have the new color showing, click OK. The button that was once blue is now purple. Purple is also now the working color.
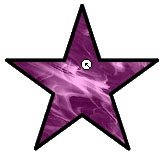
Use your new color by clicking in the star, turning it purple.
Every color can have a texture applied to it. Let's see this in operation now.
Double-click the purple color button to bring up the Color Selector again. Use the texture control to choose "Wispy" as your texture. You should now see an image of purple wispy glass where before there was a solid purple.
Click OK to close the dialog box. Purple wispy glass is now on the button and is also the working color. Click on the star to see that color in your design.
The availability of glass images from glass manufacturers is one of the most exciting features of Glass Eye 2000. This feature is active in the Professional and higher editions only.
Begin by double-clicking the red color button. Doing so will bring up the Color Selector with the "Textured Color" tab selected with red as the current color. Now switch to the glass page by clicking the "Glass" tab at the top. The Color Selector will now look something like this:
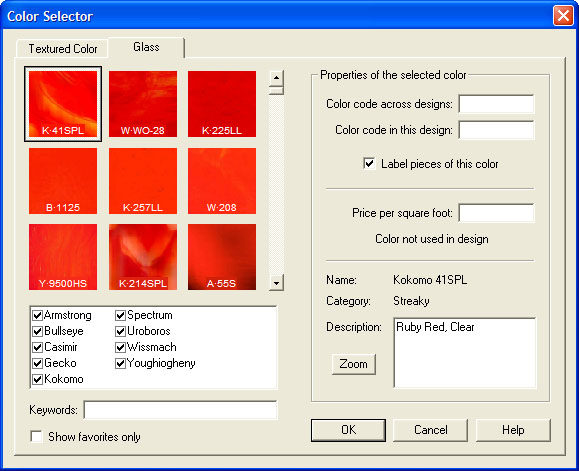
The nine red squares represent the nine glass samples that best match the red on the Textured Color page. (The samples shown here are from an extensive glass library. If you downloaded the trial version from our website, you will see a different set of glass because your library is much smaller.) The best match is in the top-left corner, then next best is to its right, and so on. The entire glass library has been sorted this way, and to see the rest you only have to scroll using the control to the right of the squares.
Have some fun experimenting with this unique way of selecting glass. Click on the Textured Color tab and select a color, then click on the Glass tab to see the entire glass library sorted according to how well samples match the color.
At the bottom of each glass sample is text that indicates the manufacturer and part name of the sample. The first character is the first letter of the manufacturer name, then after a dot is the part name of the glass. For example, K·41SPL is shorthand for Kokomo 41SPL. By clicking on a glass sample it becomes highlighted, and then you can learn more by examining the right-hand side of the Color Selector. In the current example, we can see that the selected sample is streaky glass with the description "Ruby Red, Clear."
You can filter the list even further to help you find the glass that best suits your needs. Each name in the list of manufacturers can be turned on or off, so you can see glass from only those that interest you. Below that list is an area where you can enter keywords. Each word you enter there is compared against the part name, the category, and the description of every sample. Only if all the keywords match is that sample included. The "Show favorites only" control allows you to see only your favorite glass, and later in this lesson you'll learn how to mark a sample as a favorite.
The Professional and higher editions allow you to assign a color code and aprice to any color. We'll skip these for now, but we'll come back to color codes in Lesson 10 when we talk about piece labeling and to prices in Lesson 11 when we talk about design properties.
Have you noticed the "Zoom" button to the left of the description? Highlight a glass sample (for example, Armstrong 81DS) and then click on that button. A close-up view of the glass sample will appear:
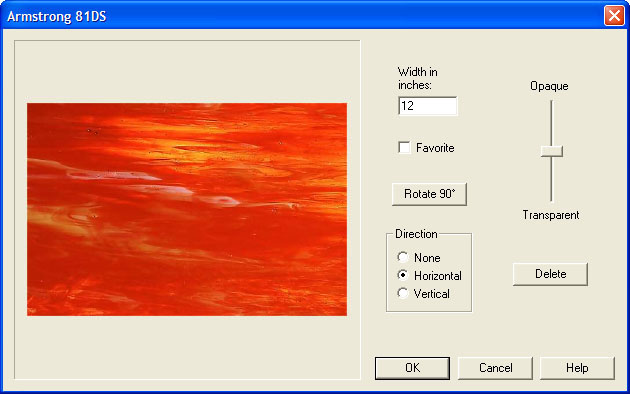
Here you have access to a few functions that are not seen on the Color Selector. The first one is the ability to specify the measured size of the sample. This measurement is important, as it tells Glass Eye 2000 the correct magnification level for the glass texture when it appears in your design. The figure above shows that the glass pictured measures twelve inches across. These values are provided by the manufacturer and you should not change them unless you know them to be wrong. If you add any glass samples of your own, be sure to check this value so that your glass appears correctly when used. (Read the Help topic "Adding Glass and Textures" for instructions on how to add your own samples to the glass library.)
Try marking the sample as a favorite and then clicking OK to see how that affects the images shown in the Color Selector. There you can check the "Show favorites only" box to filter the list of glass samples to show only your favorites.
The "Rotate 90°" does just what you think it does, and you're welcome to experiment with it now.
"Direction" refers to the flow of the appearance of the glass. For example, Armstrong 81DS appears to flow left to right, so it has a horizontal direction. If you feel that a glass image has a direction different from the one indicated then you are welcome to change it. The direction property affects several Glass Eye 2000 operations; for example, piece labels can be aligned with glass direction.
The slider changes the opacity level associated with the image. All images start with a 50% opacity, which in Glass Eye 2000 simply means a normal opacity level. You can change this value if you know that a particular glass has a higher or lower opacity. Once you move your mouse pointer near the slider you'll see the glass image rendered transparently, with the opacity value in back of it to give you an idea of how something behind the glass will show through. Later in this lesson you'll see how glass opacity can affect the appearance of your design.
You can use the "Delete" button if you know that you will never need this sample. Let's not experiment with that now.
Click the "Cancel" button to return to the Color Selector.
 To gain quick access to some of the functions just described, do a right-click on any of the glass samples. The menu pictured to the right will appear.
Try this now and mark one of the samples as a favorite. Of course, if it is already marked as a favorite then the menu choice will read "Unmark as Favorite."
To gain quick access to some of the functions just described, do a right-click on any of the glass samples. The menu pictured to the right will appear.
Try this now and mark one of the samples as a favorite. Of course, if it is already marked as a favorite then the menu choice will read "Unmark as Favorite."
You can select a glass color either by double-clicking the sample or by highlighting the sample and then clicking the OK button. Select any one of the samples now. You'll see the sample appear on the color button where the solid red used to be. It is now the working color, so you can now right-click on one of the red stripes in the flag to turn all the solid red stripes to red stripes that look like real glass.
The glass samples in our library come directly from the manufacturers and they range in width from 2" to 24". When a glass image is smaller than a piece in your design, the image is repeated as many times as necessary. You might have noticed that when you placed glass within the flag the image was repeated, but this depends on the size of the glass sample you selected.
The border lines between adjacent images often distract from the beauty of a design. One way to reduce the visibility of these borders is to flip every other image so the joining of two images becomes a reflection. If you want to eliminate the repetitions entirely you can choose to have each glass image stretched to fit each piece exactly. This has the disadvantage of ignoring the actual size of the glass texture, but it can be preferable in some circumstances.
 The Color Options command allows you to choose from among these rendering methods. Choose "Color Options" from the View menu now. Try switching between the
"stretch" option and the "actual size" option to see how the appearance of your design changes. When rendering at "actual size" try reflecting
the images to see how that looks. There is even the option of using a solid color approximation, which can be useful when you want to get a sense of
the color but not be distracted by the texture.
The Color Options command allows you to choose from among these rendering methods. Choose "Color Options" from the View menu now. Try switching between the
"stretch" option and the "actual size" option to see how the appearance of your design changes. When rendering at "actual size" try reflecting
the images to see how that looks. There is even the option of using a solid color approximation, which can be useful when you want to get a sense of
the color but not be distracted by the texture.
While we're here, experiment with other options on this dialog box. You can display a second color palette if you need more colors than will fit on a single palette. There is also a button to limit the colors that appear on your palette to only those that appear in your design.
The "highlight" option at the bottom causes the border of a piece to be highlighted when the mouse is placed within it. Turn on this feature, click the OK button, and move the mouse on top of the flag. You must be in color mode (or manual numbering mode, which we'll hear about in Lesson 10) to see the highlighting.
We'll try out the Opaque/Transparent slider in a separate exercise later in this lesson.
Make sure your glass rendering is at actual size, then close the Color Options dialog.
Instead of always choosing the working color by clicking a color button, while in Color mode you can choose the working color by holding down the Shift key and clicking within a piece. The cursor will change to an eyedropper shape when you do this. Try this now by clicking on one of the white pieces while holding down the Shift key. White is now the working color. Notice how the white color button appears pressed in.
The working color can easily be placed onto any button on the color palette. Just hold down the Shift key and click a color button.
It is not often that you need to place the working color on a button, but there is one situation where it comes in very handy. Let's go through it now using the color button showing purple wispy glass. Double-click that button, choose a different color, and click OK. Now you no longer have purple wispy glass on the button, but the color is not lost because you do have it as the color of the star. To get purple wispy glass back on a color button, hold down the Shift key and click within the star, making its color the working color. Now with the Shift key still down, click a color button. The working color of purple wispy glass has now been transferred onto the button.
Note that another way to get the purple wispy glass on the color button would be to use the "Match Palette to Design" function discussed above.
Please save your recolored flag design before continuing.
![]()
It is easy to change the position and rotation of the glass images in
your design. To see how this works, start by entering Glass Orientation mode
using the toolbar button shown at the left.
 (If you have only the Standard or Professional Edition then you'll see a message informing you of your upgrade options; click "Proceed" to continue.) Now
position the mouse pointer over the star. To move the glass image, simply drag the glass to another location: hold down the left mouse button, move the mouse, and then release the button.
(If you have only the Standard or Professional Edition then you'll see a message informing you of your upgrade options; click "Proceed" to continue.) Now
position the mouse pointer over the star. To move the glass image, simply drag the glass to another location: hold down the left mouse button, move the mouse, and then release the button.
Rotating the glass is just as easy. With the mouse pointer on a glass image, use the right and left arrow keys on your keyboard to rotate the glass clockwise and counterclockwise. If you have a mouse wheel, turning the wheel will rotate the image.
By holding down the Ctrl key while positioning or rotating the glass, you affect all pieces of the same color.
Close the flag design without saving it.
The Professional Plus and Enterprise editions of Glass Eye 2000 allow you to set the transparency of the glass in your designs. Imagine having a photograph of the intended location for your stained glass project. You could then import that image as a background and then place your design in front of it with a suitable transparency value. There's no better way to preview how your project will look when finished!
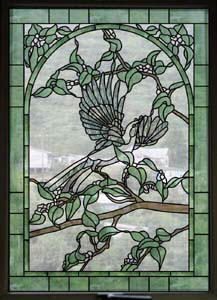 No matter what edition of Glass Eye 2000 you have you can try the following test. Open the design called "View" in the Tutorial folder. Notice that you
can see the background image through the design. If you'd like to see the background image on its own, simply delete the design by doing a Select All
and then a Cut (easily done with two keystrokes: Ctrl+A and Ctrl+X); after you've seen the background image, use the Undo command to restore the design.
No matter what edition of Glass Eye 2000 you have you can try the following test. Open the design called "View" in the Tutorial folder. Notice that you
can see the background image through the design. If you'd like to see the background image on its own, simply delete the design by doing a Select All
and then a Cut (easily done with two keystrokes: Ctrl+A and Ctrl+X); after you've seen the background image, use the Undo command to restore the design.
Now use the Color Options command on the View menu. Drag the slider up and down to change the transparency level. You'll see the effect immediately. The slider affects the opacity of all glass images in a design evenly. If you want to change the opacity of individual glass images, use the slider that was introduced in the section "Zooming in on glass" above.
Be aware that designs with transparency take longer to draw on your screen than designs that are 100% opaque. When you don't need the transparency feature, use the Color Options command and move the opacity slider to the top.
Close this design without saving it.
Next Lesson: Text and Piece Labels