In this lesson you'll learn to use the shortcut menu, and you'll see how it will help with drawing rectangles, squares, ellipses and circles. You'll also learn about drawing polygons and the options on the Drawing Properties dialog box. Lastly, you'll learn how to customize the shortcut menu to the way you work.
Begin this lesson by clicking the New button to start a new design, just as you did to begin your mushroom design.
 The shortcut menu
Common in Windows programs is a menu called the shortcut menu. This is nothing more than a menu that appears when you click the right mouse button. The items on the menu will change depending upon the circumstances under which you bring up the menu.
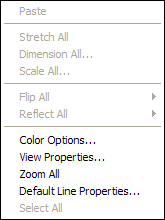
Click the right mouse button now and you will see the menu shown here. This is the current shortcut menu, giving you a choice of four items (with others unavailable because there is no design). We are not interested in any of these options, so left-click outside the menu to remove it. In the remainder of this lesson we will bring up other shortcut menus that will interest us more.
 A rectangle can be drawn by connecting four straight lines. This requires a fair bit of work, and it's difficult to get the alignment perfect. Fortunately, there is a
command just for drawing rectangles. There are two ways to draw a rectangle:
A rectangle can be drawn by connecting four straight lines. This requires a fair bit of work, and it's difficult to get the alignment perfect. Fortunately, there is a
command just for drawing rectangles. There are two ways to draw a rectangle:
 Let's give both of these a try. There is no toolbar button for rectangle drawing, so choose "Rectangle" from the Draw menu. Before you begin drawing,
click the right mouse button. Because you are now in Rectangle mode, you will see a different shortcut menu than before.
This menu provides several options, including letting you choose your method for drawing rectangles. The bullet symbol tells you which method is currently in use. In
this example, the "Center, Dimensions" method is being used. On your menu, click on the "Center, Dimensions" item to choose this method.
Let's give both of these a try. There is no toolbar button for rectangle drawing, so choose "Rectangle" from the Draw menu. Before you begin drawing,
click the right mouse button. Because you are now in Rectangle mode, you will see a different shortcut menu than before.
This menu provides several options, including letting you choose your method for drawing rectangles. The bullet symbol tells you which method is currently in use. In
this example, the "Center, Dimensions" method is being used. On your menu, click on the "Center, Dimensions" item to choose this method.
Now click (left mouse button) somewhere in the view to begin drawing your rectangle. Remember to release the button; don't do a drag. Move the mouse to another part of the view. You will see a rectangle with its center where you first clicked and with one corner at the pointer. Click a second time to complete the rectangle draw.
There is nothing new about the rectangle you have just drawn. It is nothing more than four curves connected at the knots. Enter Pick mode, drag one of the corners, and you will see that the lines are not constrained to be arranged as a rectangle.
Notice that you defined the rectangle by clicking, not dragging, the mouse, which was also true when you drew the curves for the mushroom. You might keep this rule in mind:
Try drawing a few more rectangles until you feel comfortable with the process.
Click the right mouse button to bring up the shortcut menu again. This time choose "Corner, Dimensions" and then draw a few more rectangles. This time you'll see that the first point you click becomes one corner of the rectangle and the other point becomes the opposing corner.
Now choose "Square" from the Draw menu and try drawing some squares. Experiment with changing the square drawing method by using the shortcut menu. If you run out of room on the screen, just scroll the view.
At the top of the shortcut menu are two options, one called Show Measurements and the other called Keyboard Entry. These options are available with the Professional Plus and higher editions and also during the trial period, but even with a Standard or Professional Edition you'll be able to use these features in a limited way. If you get warning messages having to do with licensing, just click the Proceed button.
Choose "Square" from the Draw menu and click the right mouse button to display the shortcut menu. Select "Show Measurements" and start drawing your square. This time while you draw you'll see an indicator showing you the width of the square. You'll get similar feedback when drawing other shapes.
 Click
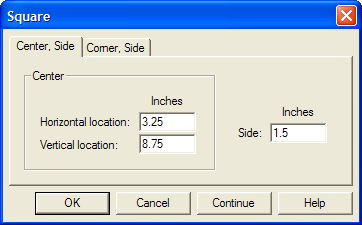
the right mouse button again and this time choose "Keyboard Entry". A dialog
will appear, looking something like this.
Click
the right mouse button again and this time choose "Keyboard Entry". A dialog
will appear, looking something like this.
Here you can enter the location and size of the square using the keyboard so that you can get precisely the shape you want. The tabs at the top of the dialog let you choose between entering the location of the center of the square or the location of one of its corners.
For access to these functions without using a mouse click, keyboard shortcuts are available. For drawing measurements press the spacebar, and for keyboard entry press the Enter key. ESC means to cancel, as usual. You must have already started to draw your shape for these keys to work.
Now that you are familiar with drawing rectangles and squares, experiment in the same way with ellipses and circles. The process is the same: choose "Ellipse" or "Circle" from the Draw menu, and bring up the shortcut menu to choose the drawing method. Try drawing several of each using both drawing methods.
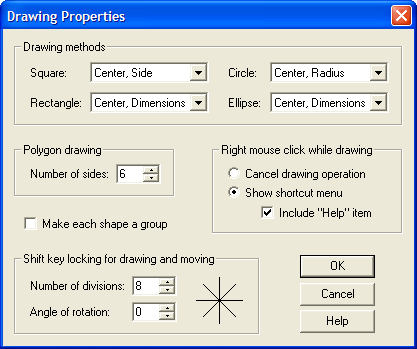 Another way to access the drawing methods is to use the Drawing Properties command on the Draw menu. Choose the feature now to
see a dialog box like the one at the right. You'll see the currently selected drawing methods for squares, rectangles, circles and ellipses.
Another way to access the drawing methods is to use the Drawing Properties command on the Draw menu. Choose the feature now to
see a dialog box like the one at the right. You'll see the currently selected drawing methods for squares, rectangles, circles and ellipses.
Notice that you can set an option to have the shapes you draw formed into groups. With this setting, selecting any line of the shape causes all lines of the shape to be selected. We'll discuss groups more in Lesson 18.
Earlier in this lesson we discussed the shortcut menu that appears when you click the right mouse button while drawing. If you don't want a shortcut menu but would prefer to have a right mouse click cancel the current drawing operation, you can indicate that preference here. You can also elect to remove the Help item from the menu.
The controls in the bottom left of this dialog box allow you to choose your own Shift key locking directions, used when drawing and moving lines. (Review Lesson 4 if you need to be refreshed on that topic.) We won't discuss this feature now, but you can experiment if you wish. Click the Help button if you would like more information.
In the middle of the Drawing Properties dialog box is a control for choosing the number of sides when you draw a polygon. Make sure the number of sides equals six and then click OK. Now choose Polygon from the Draw menu to enter polygon mode. Polygons have only one method of drawing: a click at the center and then a click at a corner. Using this technique, create a few hexagons in your design. If you like, return to Drawing Properties, select another value, and draw polygons of a different shape.
Glass Eye 2000 allows you to create your own shortcut menus, and also lets you assign hot keys to your favorite commands. Let's try this now. Start by choosing "Customize Menus and Hot Keys" from the View menu.
There are two main shortcut menus in Glass Eye 2000: one for when there is nothing currently selected in the design and one for when there is a selection. You can configure these two menus independently to provide different choices based on this context. Note that some choices make sense only when there is a selection and you will not be able to add these to the "nothing selected" menu.
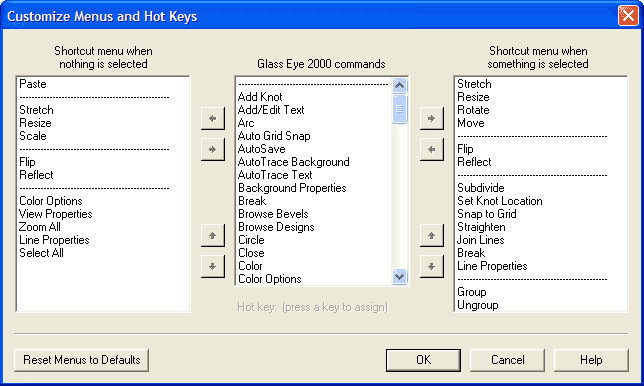
The dialog has three panes that you use to build the menus. The center pane contains all of the commands available in Glass Eye 2000 as well as a horizontal line that you can use to group and organize the commands. Resting the cursor momentarily on a command in this list will display a brief description of the command's function. The two side panes display the current organization of the "nothing selected" and "something selected" shortcut menus.
To add an item to one of the menus, highlight the item in the command list by clicking on it, and then click the top arrow button pointing to the menu where you want it to be added. By default the item will be inserted at the bottom of the menu. If an item is currently highlighted in the menu you are adding to, the new item will be inserted directly below it. Only the horizontal line can be added more than once to either menu.
To remove an item from a menu, highlight it and then click the corresponding arrow pointing back to the list of commands.
You can modify the top-to-bottom order of items in either menu by highlighting the item you wish to move and then clicking the adjacent up or down arrow buttons.
You may also define a "hot key" for any command. While highlighting a command in the command list, press the key that you want associated with that command. You'll then be able to invoke that command while working on a design just by clicking that key; no Ctrl or Alt key sequence is required. To delete a hot key, press the Delete key while highlighting a command in the command list.
After you've experimented with this feature, click the "Cancel" button.
We do not want to keep any of the work done in this lesson, so choose "Close" from the File menu and click "No" when asked if you want to save.
Next Lesson: Adding and Deleting Knots