Design of the Month · September 2007
-
"Giant Mining Machinery"
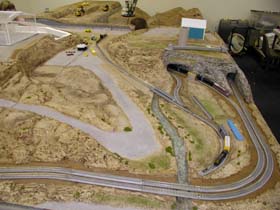
This series of stained glass art pieces started in a peculiar way. Being a retired designer of electrical systems for P&H Mining Equipment and working in mines around the world for many years, I was very familiar with mines and mining equipment. In 2004 the annual Mining Expo was held in Las Vegas. Several of us retirees familiar with mining were asked to make an N-scale model of a typical western coal mine. The exhibit was 8' x 16' and depicted a series of mining machines digging the coal and moving it by train. The display was elaborate and included moving machinery and a train loading and unloading coal.
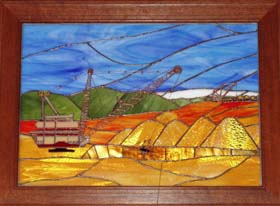
It was known I made stained glass art as a hobby and was asked to make a commemorative gift for a customer who bought a second giant dragline machine. The design would show his new dragline with his first machine working in the background. These machines are giant structures with booms 400 feet long and each is bigger than a football field. The challenge was to get the proper perspective of the two machines and the background. I did not own the Glass Eye 2000 and had to resort to hand drawings and a photocopy machine to scale the draglines. The process was frustrating and time-consuming. The color renditions were crude and it was difficult to get the client to imagine how the actual glass would look.
I constructed the background scene and then the two draglines. The machines were then laid over the background. The finished artwork was approximately 27" x 36" and I made for it a mahogany frame. I spent around 150 hours on this project.
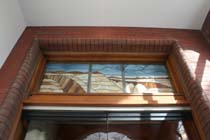
Before presentation to the customer in Australia, it was displayed in the lobby of P&H Mining headquarters in Milwaukee. The artwork was so well received that I was asked to make a stained glass window depicting all the equipment P&H manufactured. The lobby was to be renovated so it was a perfect time to place a new transom window at the lobby entrance.
Next project
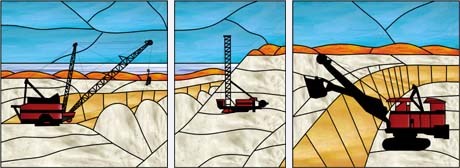
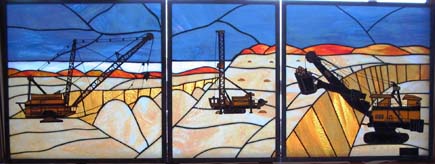
The space for the window was 27" x 67". It was to depict an electric mining shovel, a blast hole drill and a dragline in a mining setting. Since the machines vary in size it was important to maintain some perspective of their size and then place them in a mining setting without too much artistic license.
I attended the Glass Craft & Bead Expo in 2006 where I saw a demo and learned more about Glass Eye 2000. With the various functions available it seemed like a valuable tool for my new project. The size of the window made full-size hand drawings difficult. With urging from my wife we purchased the Professional Edition at the show.
Designing the windows
The size of my workshop and the handling weight of the window dictated that it be done in three sections. This also worked well for depicting the three different mining machines. The sections were divided according to a real life situation. The shovel, being the midsized machine, was put in the foreground of the right panel. The middle panel depicted the blast hole drill, the smallest machine, working further back at a higher elevation. The left panel depicted the dragline, the largest machine, working at a lower elevation. The horizon and terrain were used to evoke this illusion.

I designed the background first. This established the relative sizes of the machines that would be laid upon it. The "Group" function was used to isolate the background and the machine details. This allowed for easy resizing of the machines to fit the background and to give some sense of relative size among the machines.
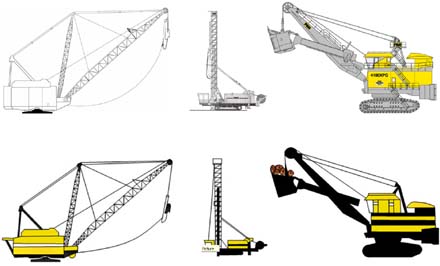
I received detailed profile drawings of the machines from P&H. I used the "Add Background" function and brought them into Glass Eye 2000. These scale drawings had too much detail, so I drew simpler versions using the drawing tools in the software.
The panels were finished with a zinc frame. The "Resize" function was very helpful to maintain the proportions and size the artwork, including the frame, to the exact dimensions required.
Patterns
The final design files were saved to a disc, with each panel in its own file. Full size reproductions were made for each panel, each background and each machine. Several reproductions were made for each machine because some of the detail parts were cut separately and layered together to give the illusion of depth. Full size printouts were made at a blueprint company using a Glass Eye 2000 demo disc — a great convenience.
Final build
As previously mentioned, the panels were made in two stages. First the background was cut, foiled and completely assembled. The zinc border was added and the artwork was cleaned and patina applied. After this I constructed the machines. Many small details were added according to the original drawings. The steel rope cables were made to scale from twisted copper wire. Actual miniature chain was used as required.
Actual dragline booms, gantries and masts are constructed of steel tubing called chording. To simulate this, double-strength clear glass was cut to the outline of the boom, gantry or mast. The chording was simulated with several layers of copper foil laid on the glass in a crisscross pattern. A final bead of solder was placed on the copper to give it some depth and roundness much like the actual tubes that make up the chording. Ladders and handrails were made of #16 or #14 copper wire. Adding the detail was time-consuming but well worth the effort!
The machines were affixed to the background with dabs of five-minute epoxy and a few solder points. Any disturbed patina was cleaned and redone as required. The entire panel was then polished. The panel structure was rigid enough to eliminate the need for reinforcement.
The window can be viewed coming into and leaving the lobby. Because of the layering, the two sides look completely different. Lights were installed to the back side of the window so that the vivid images could still be seen at night or on cloudy days.
Viewed from the outside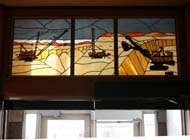
Viewed from the insideI was very happy to have Glass Eye 2000 for this project as it greatly increased my efficiency.
Next project
Having attended the Glass Craft & Bead Expo for several years I decided to enter a piece in their Gallery of Excellence. I used Glass Eye 2000 once again to design a piece of mining equipment. I had the shovel details from the window work and decided to embellish that design for the show.
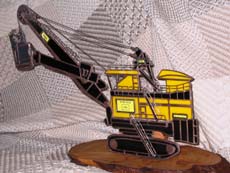
The result was a design based on the latest P&H shovel Model 4100XPC. I made the glass in several layers to give the illusion of depth, and used copper overlays and wire for details. All wire rope was twisted copper wire. Railings and ladders were made of solid copper wire. All effort was made to scale the details correctly. The artwork was displayed on an oiled slab of wood. A picture and details of the actual machine were on display to emphasize its size and weight. The entry was unique and thought to be a different type of "working with glass." It won no award at the Expo, but later won a second place award at the 2007 Wisconsin State Fair.
~ Richard Czubkowski
About the artist
Richard is a retired electrical engineer who spent over 40 years designing electrical control systems for mining shovels. His work has taken him from above the Arctic Circle to southern Australia, with extensive travel to China, India, Africa and Russia, including Siberia.
In 1998 Richard took a six-week evening course in basic stained glass. Since then he has constructed several original geometric panels and Prairie Style lamps.
Richard is strictly a hobbyist, and generally gives away his work as gifts or for auction by charitable groups. For rare commissioned work his clients pay only for materials and a donation to a charity.
This pattern may be used to make one or more artworks for sale or personal enjoyment. This pattern may be printed for personal use only and may not be sold or given away in printed or electronic form.
Each month we feature a project designed using Glass Eye 2000. Do you have a project to share with the world? Contact Dragonfly Software and your creation might be our next Design of the Month.