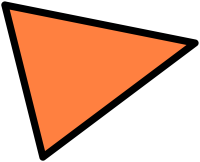
 Double-click on the word "Triangle" to open that file. Your view should now hold a simple triangular pattern.
This lesson will show you a few of the different ways you can view a design. You'll learn about:
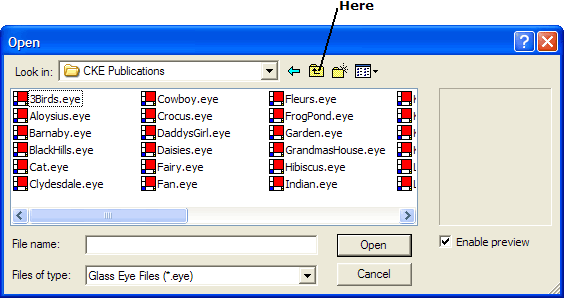
Let's open a file containing just about the simplest stained glass window imaginable: a triangle. Use the Open command as you did in Lesson 1 and look in the Tutorial folder. Depending on what design is currently showing, you might have to navigate over to this folder. For example, if you had the "Barnaby" design on your screen then you're probably now seeing the contents of the "CKE Publications" folder. To return to the base Glass Eye 2000 folder you'll first have to twice click the "Up One Level" icon as shown:
Once you've navigated to the base Glass Eye 2000 folder, you'll see this:
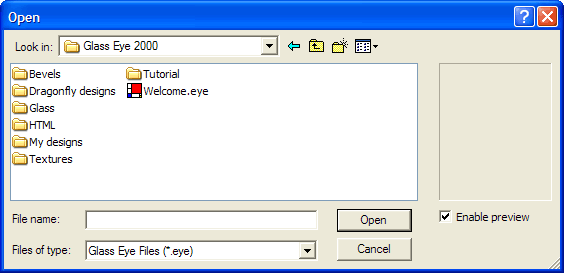
Open the Tutorial folder by double-clicking it.
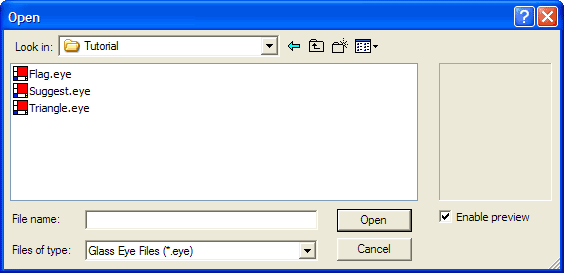
 Double-click on the word "Triangle" to open that file. Your view should now hold a simple triangular pattern.
Don't be troubled by the simplicity of this design. We could use a more realistic design, but that would only add unnecessary complexity. Let's keep things simple while you learn.
Before we discuss how to change the design, let's experiment with the different ways this design can be viewed.
Scrolling allows you to choose which part of your design is visible in the view. You can scroll the view by dragging either of the scroll boxes to the right and to the bottom of the view. (To "drag" means to move the mouse while keeping the left mouse button held down.) Try dragging the scroll boxes now.
You can also scroll by clicking in the area on either side of a scroll box, or by clicking on any of the scroll arrows. Play with these features on both scroll bars until you feel comfortable with them.
![]() Another way to scroll the view is to use the Pan button, shown here. Click this button now. Notice that after you do this the Pan button has popped in and
the Pick button has popped out; notice also that the pointer changes to a shape corresponding to the image on the button. These changes let you know
that you are now in Pan mode. Without holding down any mouse buttons, move the pointer to anywhere in the view. Now hold down the left mouse button and
drag the pointer around the screen. The view will scroll as you move the mouse.
Another way to scroll the view is to use the Pan button, shown here. Click this button now. Notice that after you do this the Pan button has popped in and
the Pick button has popped out; notice also that the pointer changes to a shape corresponding to the image on the button. These changes let you know
that you are now in Pan mode. Without holding down any mouse buttons, move the pointer to anywhere in the view. Now hold down the left mouse button and
drag the pointer around the screen. The view will scroll as you move the mouse.
Zooming allows you to increase or decrease the size of the image in the view. The quickest way to zoom is to use your keyboard: press either the "+" key to Zoom In or the "–" key to Zoom Out. Give them both a try now. There is even a Zoom All key: Enter. No matter what scroll position or zoom factor your view currently has, pressing the Enter key will always restore you to a full view of your design.
![]() For more precise zooming, you can enter Zoom mode by clicking this toolbar button. Try it now. The pointer changes to the magnifying glass shape
signifying Zoom mode. You can now click anywhere in the view and two things happen: the location you clicked on moves to the center of the view and the
view is zoomed in. Try clicking with the right mouse button and the same thing happens except that you zoom out instead of in.
For more precise zooming, you can enter Zoom mode by clicking this toolbar button. Try it now. The pointer changes to the magnifying glass shape
signifying Zoom mode. You can now click anywhere in the view and two things happen: the location you clicked on moves to the center of the view and the
view is zoomed in. Try clicking with the right mouse button and the same thing happens except that you zoom out instead of in.
For even greater zoom control, while in Zoom mode you can make a zoom box (a rectangle) around the part of the image you want to fill the view. To try this, position the pointer over the top-left knot of the triangle. Press down the left mouse button, then while holding down the button move the pointer to the middle of the triangle; notice the zoom box as you drag. Now release the button. You should now see only the part of the triangle that appeared within the zoom box before you released the button. You can repeat this process a few times to zoom in more, although after a few zooms no further zooming will be allowed.
If you have a mouse with a wheel, rolling the wheel will normally scroll your view vertically. If you'd like the mouse wheel to control zooming, you can set this behavior using the Units and Precision command you saw in Lesson 2.
Now press Enter to return to a full view of the design, and click the Pick toolbar button to return to Pick mode. Your pointer should once again look like an arrow.
In addition to changing the size and position of the view of a design, you can change the way the design is drawn simply by clicking toolbar buttons. The need for some of these options might be unclear at first, but as you begin designing you are sure to find them all useful.
Understand that there is a difference between changing the view of a design and changing the design itself. All the changes we're making here affect only the way we see the triangle; the design itself isn't changing. This is similar to changing the way you take a photograph. You can change the camera lens, the lighting, or the film type. All of these change the view (the photograph) of the person, but the person remains unchanged.
Let's look at the most useful view properties.
![]() This is the Show Hairlines button. Click it now. The lines of the triangle are now shown as very thin lines, and the button should look pressed in to let you know you have Show Hairlines enabled.
This is the Show Hairlines button. Click it now. The lines of the triangle are now shown as very thin lines, and the button should look pressed in to let you know you have Show Hairlines enabled.
With all view property buttons, a "pressed in" button means that feature is enabled, and a "popped out" button means that feature is disabled.
If you click on the button again you will pop the button out, causing Show Hairlines to be disabled. Try clicking on the button a few times and see how the triangle changes. Leave Show Hairlines disabled before continuing.
![]() The next option is Show Rulers. Clicking the button will reveal a horizontal and a vertical ruler. Looking at the rulers, you can tell that the triangle
measures 5" wide and 4" high. You might want to scroll or pan the window now to see how the ruler responds. Notice that there are marks on the ruler that
show you the exact location of your pointer. Also notice the pointer location shown numerically at the rightmost end of the status bar.
The next option is Show Rulers. Clicking the button will reveal a horizontal and a vertical ruler. Looking at the rulers, you can tell that the triangle
measures 5" wide and 4" high. You might want to scroll or pan the window now to see how the ruler responds. Notice that there are marks on the ruler that
show you the exact location of your pointer. Also notice the pointer location shown numerically at the rightmost end of the status bar.
Find the point in the view that measures 0" on both the horizontal and vertical rulers. This point is called the ruler origin. You can change the origin to any location you like. Try this now by choosing "Set Ruler Origin" on the View menu, and then clicking anywhere in the view. Notice that the location you clicked on has become the new ruler origin.
Now disable Show Rulers.
![]() Next is the Show Knots button. The button is probably in the down position, so click on it to bring it up. You should notice that knots are no longer
visible. The main purpose of this option is to allow you to view your design in a more natural, uncluttered state than when knots are shown. Of course,
it is harder to change the shape of a curve when you don't know where the knots are!
Next is the Show Knots button. The button is probably in the down position, so click on it to bring it up. You should notice that knots are no longer
visible. The main purpose of this option is to allow you to view your design in a more natural, uncluttered state than when knots are shown. Of course,
it is harder to change the shape of a curve when you don't know where the knots are!
Click the Show Knots button again to turn that feature back on.
![]() You can turn piece color on and off using the Show Colors button. Turning off color lets you concentrate on the pattern itself, rather than on the colors
of the glass. Also, it takes time for the computer to display glass, so hiding colors when you don't need them will speed up the time to draw a design on the screen.
You can turn piece color on and off using the Show Colors button. Turning off color lets you concentrate on the pattern itself, rather than on the colors
of the glass. Also, it takes time for the computer to display glass, so hiding colors when you don't need them will speed up the time to draw a design on the screen.
Click the Show Colors button again to turn that feature back on.
You can now exit Glass Eye 2000, or continue to the next lesson.
Next Lesson: Changing the Triangle